Home / Integration plugins / TREND IQVision SMS and calls integration

TREND IQVision SMS & voice call alerts – integration manual

Here we describe how to send SMS texts and calls (ring calls, text-to-speech calls) from TREND IQVision using SMSEagle Hardware SMS Gateway.

SMSEagle is an offline hardware SMS gateway. Therefore, no external connection to a third-party system is required. All notifications are generated on-premise and sent directly to a cellular network. This solution can be used in secure installations without Internet access. SMSEagle offers secure and reliable message processing with a built-in database for message queueing and an automatic retries mechanism.

Setup is easy and should take 10-15 min to complete.

SMSEagle Setup

  1. Create a new user in SMSEagle (menu Users > + Add Users).
  2. Grant API access to the created user:
    • click Access to API beside the newly created user
    • Enable APIv2
    • Generate new token (copy it for later use)
    • Add access permissions in section Messages for: Send SMS
    • Add access permissions in section Modem for: Make a ring call, Make a TTS (for voice alerting)
    • Save settings

Notice: Voice functions are only available to users who have purchased the VOICE add-on for their SMSEagle device.

IQVision Setup

To enable SMS alerts via SMSEagle Hardware SMS Gateway you will need a SMSEagle driver for Niagara4. The driver’s main purpose is to serve as a gateway to send SMS via SMSEagle.

1. Driver Installation

  • download the zip archive with driver files (the driver is free of charge).
  • extract the zip archive and copy all included *.jar files to your Niagara modules directory, which is typically C:\Niagara\Niagara-4.x.xx.xx\modules. For correct behavior, it is necessary to install *.jar files on the client platform (Workbench PC) and on the target platform (Supervisor).
  • close the Niagara Workbench after inserting all the modules in the folder. Next time you start the Niagara Workbench the driver will be loaded in Niagara Workbench and immediately available for use.
  • notice: a service component is not required during the installation

2. Driver Configuration

a) connect your PC with IQVision Supervisor to the network
b) add new SmsEagleNetwork to your Drivers node
c) add new SmsEagleDevice to the network
d) configure newly added device

Fill in the following properties of SMSEagle Device

  • Enabled: set to True
  • Ip Address: fill in IP address or domain name of your SMSEagle device
  • Port80 (for HTTP connection) or 443 (for HTTPS connection)
  • Api Key: API key created in SMSEagle webGUI

Note: if you want to use HTTPS connection between Niagara and SMSEagle you must have SSL certificate correctly configured on SMSEagle device.


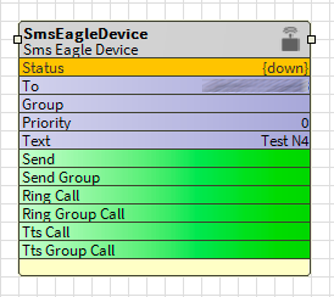
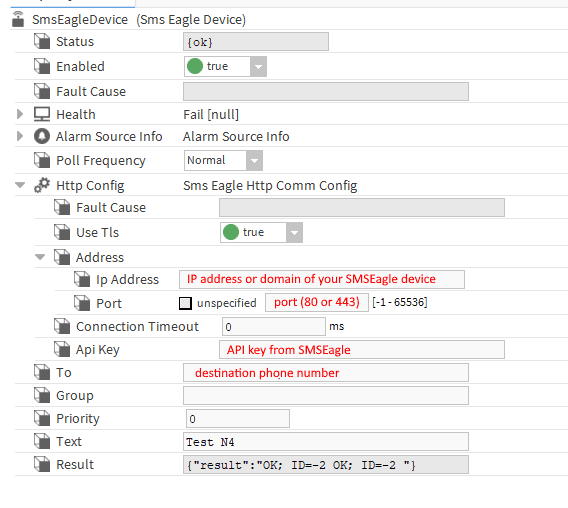
3. Properties of SMSEagleDevice

Every device has following properties:

  • To: recipient phone number (or multiple numbers separated with comma)
  • Group: (optional) group name defined in SMSEagle Phonebook. If you define the group in SMSEagle phonebook (it must be set as public), you may send SMS to the group of recipients
  • Priority: (optional) priority of SMS – value between 0-9 (9 is the highest priority)
  • Text: text of SMS message

Every device has defined the following actions:

  • Send: send SMS to recipient defined in To parameter
  • Send Group: send SMS to the group defined in Group parameter
  • Ring Call: make wake-up call (ring only) to recipient defined in To parameter
  • Ring Group Call: make wake-up call (ring only) to group defined in Group parameter
  • Tts Call: make voice call with text-to-speech conversion to recipient defined in To parameter and with text defined in Text parameter
  • Tts Group Call: make voice call with text-to-speech conversion to group defined in Group parameter and with text defined in Text parameter

3. Additional setup to nicely format the alarm message in Trend IQVision

a) to re-engineer the Trend alarm, once its lands inside Niagara, you must apply a JSON alarm schema connected to the alarm console, which requires the JSONToolkit driver to be licensed within the installation of Niagara, as well as have a valid SMA active on the base license, to ensure this additional feature retains functionality.

The default alarm class received the messages from the BMS field devices is presented in the console for displaying within the supervisor, but then routed back out to the JSON Alarm Recipient module.

b) In the JSON module, define root queries, which tell the schema what specific information to pull from the alarm, apply a label to it, the format within a JSON payload. The picture shows example root definitions as well as sample output from the schema once an alarm is processed.

Now with the alarm data in the JSON format, with only the specific information we need to be relayed as part of the SMS solution, some manipulation has to be done of the output of the schema to allow it to work properly with the SMSEagle network device in Niagara.

c) Remove unnecessary characters.
Due to the ‘{‘, ‘}’ fields that open and close a JSON output, if you simply try to run the output through StringWritable and feed that to the SMS Device, it will fail the connection to the SMSEagle router and no SMS will be sent. Also, the timestamp and source name has too many unnecessary characters, so this also requires trimming. To do this, we will use JSON Demux modules to break the JSON payload into individual lines, to separate certain elements, edit them and reconnect it all back together into the same string.
The picture shows the JSON alarm schema OUTPUT, being linked to the ROUTE of the JSON Demux Router module. The demux modules must be set to Auto learn, so it can take the JSON output and automatically search it for the individual lines and present them separately. You will note at the bottom of the demux module, that it now presents them as individual slots that can be written out.

d) Finally to complete the config, below shows the individual slots from the demux module, where they are linked to stringConcat modules, which essentially puts multiple strings together to form one string, based on the order you connect them in.

All data fields are merged back together this way. You’ll note, that the timestamp and the source name fields were initially run through a StringSubstring module, which simply allows you to trim that source string to remove any unwanted characters. Here is where we trim the timestamp to only the date and time in standard format, as well as the source name of the alarms just to contain only the critical info (such as the site name, network locations, and alarming input).

During the StringConcat process, you will note that we added a ‘_’ into each alternating field, this is just to prevent the fields being merged without spaces, resulting in one continuous message and make the final message easier to read.

e) The final StringWritable that now received the merged string output is what then gets linked to the SEND and TEXT fields on the SMSEagle device shown in the picture.

What is hardware
SMS Gateway?

Learn more about
SMSEagle features

Explore SMSEagle Demo device

SMSEagle is a hardware & software solution that guarantees a swift delivery of your messages to designated recipients, whether it’s for notifications, alerts, or important updates.

After registering to a demo you get a remote access to our physical device NXS-9750.

  • 14-days free trial
  • Access to over 20 functionalities